The Best Way To Travel Around Thailand – Flights, Grab App, and More!
Are you an adventurer looking for your next destination? Do you like beaches and islands, wildlife and the outdoors, cities full of culture, or maybe you’re just a big foodie? Oh and one more question: do you like to travel and have a good time without feeling like you’re spending every last dime of your hard-earned money? Well if you identify with any of the above, then you should seriously consider traveling to Thailand for your next big trip!
This past July my wife and I took a trip to this wonderful country in Southeast Asia, and we are already wishing we could go back. We had such a good time that I reached out to my friend Shelby here at Young, Dumb, and NOT Broke?! and asked if I could write an article to help spread the word about this amazing destination and help others who may be traveling to Thailand soon. Some of the topics I will talk about include:
- Popular (and unpopular) times to visit
- Flying to Thailand from the U.S.A.
- How to get around the country
- Navigating around the cities
- Lastly, how to get around the islands
I will briefly touch on some of the things we did on our trip, but this article will primarily focus on helping you plan your trip and get a feel for what to expect in Thailand. However, you definitely won’t want to miss the second article in this two-part series where I will tell you a little more about our experience in the country.
[convertkit form=895609]
In this article, I will also tell you all how much we paid for certain things to give you an idea of some of the prices you might expect if you are going to Thailand soon. However, I will put in a disclaimer that we traveled to Thailand during the “low season” when there are not as many tourists.
The “Low Season”
The “low season” typically begins around the beginning of summer (May or June) and goes until about October. This time frame is less popular among tourists because this is Thailand’s rainy season. We have heard that there can be a lot of unpredictable and rainy weather during this time. Maybe we just got lucky because the weather we experienced throughout the first half of July was amazing. It was usually partly sunny with temperatures in the 80s, and only a couple of days with some sprinkles and showers.
A Quick Background
Before I get on with it, I want to first give some brief background information about why we chose to travel to Thailand in the first place, if you’re interested. A couple of years ago before my wife and I got married, we were talking about ideas for where we wanted to go for our honeymoon. We both love to travel internationally, primarily because we both spent four months studying abroad in the Czech Republic in 2015. This experience allowed each of us to visit almost a dozen European countries, so we decided we wanted to travel to a different part of the world. At the time my sister-in-law had recently done a trip around Southeast Asia and her experience looked amazing, so after talking with her we decided Thailand would be our next big destination.
The International Flight
Our first step in planning was choosing the dates for our trip and booking our international flight. As you may imagine, flying to Thailand (which is on the opposite side of the world from the U.S.A.) isn’t necessarily cheap, especially if you don’t live in a hub city for a big airline like Delta, United, or American airlines. In some of these hub cities, we saw round-trip tickets for around $500 each, so we almost used some of our airline reward points to catch a “free” flight to one of these cities so we could depart from there. However, in the end, we decided the inconvenience and schedule uncertainty wasn’t worth it, so we paid a little over $1200 each to depart from our home airport instead. On departure day we simply stepped on a flight, and 26 short hours later we were in Thailand!
Getting around the country
When you fly into Thailand, chances are that you will be flying into the capital city of Bangkok. This is by far the biggest city in Thailand with a population of just over 8 million people (meaning it is only a little bit less populated than New York City). There are two airports in Bangkok, but we flew into the bigger of the two: BKK Suvarnabhumi Airport. If you want to start your trip somewhere other than Bangkok, you can also look at flying into one of Thailand’s other popular cities like Chiang Mai, Phuket, Krabi, or Ko Samui (just to name a few). However, when we were looking for flights BKK was the cheapest option.
Once you are in the country, domestic flights to these smaller airports around the country are very cheap. For traveling from one city to the next, we booked domestic flights on budget airlines for as cheap as $30 per person, and we compared flights using skyscanner.com. Skyscanner then fulfilled our bookings through trip.com.
The three airports we passed through were in Bangkok, Chiang Mai, and Krabi. The three flights we took were all direct one-way flights, and we used three different airlines: Thai VietJet, Thai AirAsia, and Thai Smile. These airlines all offer very cheap flights, but my favorite was Thai Smile. The list below shows how much we paid and some pros and cons for each airline:
Thai Smile – Krabi to Bangkok – $40 per person (including baggage!)
- Checked baggage is free up to 20 kg (44 lb)
- The carry-on bag limit was very small (15 lb limit, 56 x 45 x 25 cm)
- Complimentary water bottle, snack, and one other drink on the flight
- You can select your own seat for free
Vietjet – Bangkok to Chiang Mai: $30 per person (not including baggage)
- Checked baggage costs extra (we paid about $13 for each of our 10kg bags, paid for when we checked in at the airport)
- The carry-on bag limit was very small (15 lb limit, 56 x 36 x 23 cm)
- No complimentary refreshments on the flight, but they are available for purchase fairly cheap
- Your seat is assigned to you, choosing a seat costs extra
AirAsia – Chiang Mai to Krabi: $60 per person (not including baggage)
- Checked baggage costs extra (we paid about $14 for each of our 10kg bags, paid for ahead of time through the airline website to save some money)
- The carry-on bag limit was very small (15 lb limit, 56 x 36 x 23 cm)
- No complimentary refreshments on the flight, but they are available for purchase fairly cheap
- Your seat is assigned to you, choosing a seat costs extra

Google Map Showing Our Flights
Thai Smile was slightly more expensive upfront than the other alternatives for each route, but the fact that checked baggage is free made this the most cost-effective airline for us. The complimentary food and drink was also a great added bonus. If I had discovered this before the fact, then I probably would have booked all of our flights through Thai Smile. The jets themselves were all pretty similar in size and quality, and I would say that the staff was equally friendly on all airlines. If you do the math, you’ll see that the cost for each of us was about $160 total for THREE one-way flights! It can be hard to find a single one-way flight for that price in the United States!
As I eluded to before, there are also some trains, busses, and vans available for getting from one city to the next. I didn’t do a lot of research on these, but I do know that these options are typically cheaper than flying. Of course, the only catch is that you will be in transit for a longer period of time, and for us it was worth it to fly from one city to the next to make the most of our time in the country.
Getting Around Thai Cities
Chiang Mai
The two main cities we visited in Thailand were Chiang Mai and Bangkok. Chiang Mai was our very first destination in Thailand (we skipped over Bangkok at first), and we absolutely loved this city. Chiang Mai is much smaller than Bangkok, and there are a lot of things to do in and around the city. The main square downtown is walkable, but you will need to catch a ride to and from the airport. For this I have two tips:
- Get the “Grab” app. It is the Thai version of Uber/Lyft, and you can get some really cheap rides.
- It is helpful to get a Thai SIM card for your phone to use the app, and these are extremely cheap.
- We got a 24-hour SIM card at 7-Eleven for $1.50 with data, texts, and calls when we knew we would be using Grab a lot, then we added more credit to the SIM card later when we needed it again.
- If you’re on your way to Chiang Mai (or another smaller city) and someone in the Bangkok airport tries to sell you a “discounted” taxi service to your hotel, don’t listen to them.
- We almost fell for this but decided it was probably a tourist trap.
- In our case, it was cheaper to just wait until you get there and figure it out from there.
- We hailed a taxi at the airport exit for less than $5 to our hotel
Thailand is also known for having a ton of scooters/mopeds on the roads, and there are several places where you can rent one of these for the day. We did this in Chiang Mai, and it gave us the freedom to explore more of the city (plus it was just really fun)! However, be aware that you may get pulled over and ticketed if you rent a scooter and your international driver’s license doesn’t cover you for scooters/motorcycles (speaking from experience). I’m not recommending that you break the law, and I want everyone to make sure they are being safe, but the ticket was only $15 and you can only get one ticket every three days.
Bangkok
The last place we visited on our trip was Bangkok, and we primarily used Grab, the MRT (the metro/train), and we took one tuk-tuk. From my experience, I highly recommend using the MRT from the airport into the city because it’s just over $1 per ride, depending on where you’re going. We took the MRT from the airport as far into the city as we could go, and then we took a $3 Grab ride to our hotel from there (and we just did the reverse of this to get back to the airport). It’s hard to beat $6 total for two people on an hour-long transit!
We stayed on Khao San Road in Bangkok (a street with some really good nightlife), so we were within walking distance of a few attractions, such as The Grand Palace. However, Bangkok is very spread out and there are many attractions that may not be walkable. Last, it is really cheap to catch a tuk-tuk which is a small scooter-like vehicle that has a covered seating compartment on the back. I don’t want to discourage you from using any tuk-tuks, but you should be careful that you don’t get tricked by the driver. I will explain more and give some advice about tuk-tuk drivers in my next article.
Now that I’ve talked about the bookends of our trip, I’ll talk about the middle of our trip which was spent in the south part of the country. As I already mentioned we took a flight down south, but some of the other travel options, if you are heading this way, may include riding on a ferry or speed boat for part of the route. This is because the southern part of Thailand is a thin vertical strip of land with amazing ocean beaches, and the mainland is surrounded by several beautiful islands.
Getting around islands
In the south of Thailand, there are many islands that are popular tourist destinations, and some of them can only be accessed by boat. As we planned our trip to Thailand, we determined that we would have to choose just a few of these many islands, and it was a tough decision. Some of the more popular options that came up in our research are listed below:
- Ko Phi Phi
- Phuket
- Ko Lanta
- Ko Samui
- Ko Tao
- Ko Pha Ngang
- Railay Beach (this is actually a peninsula off of Krabi, but it is only accessible by boat)

The Two Main Clusters of Islands
As you can see on the map, some of these islands are located in the Andaman Sea West of Thailand, while others are situated in the Gulf of Thailand on the East side. Since we only had about 6-7 days in the South of Thailand, we decided to focus on island hopping on either the West side or the East side. We did this to limit the amount of time we spent in transit so we could spend more time doing stuff on the islands. Ultimately, we decided to visit Ko Phi Phi, Ko Lanta, and Railay Beach on the West side. However, if you have more time or you really want to go from West to East (or vice versa), you can take a relatively expensive flight between Phuket or Krabi and Ko Samui, or you can spend 5-8 hours going between Krabi and Ko Samui by van/bus and ferry.
Krabi
To begin our island adventure, we flew into Krabi and took the airport bus to the pier for about $3 per person. We had already booked ferry tickets online from the pier to Ko Phi Phi through phuketferry.com, and we paid about $14 per ticket. Looking back, we also could have just waited and bought them at the pier that day for about the same price. This first ferry was the only one we booked ahead of time, and the others we figured out as we went along.
Ko Phi Phi
The Phi Phi islands (also referred to as Ko Phi Phi) are a pair of small islands individually known as Phi Phi Don and Phi Phi Leh. Ko Phi Phi has a reputation as a party island that is often over-crowded by young travelers, but it seemed to be a little less crowded in the low season. Once we got to Phi Phi Don, we bought our ferry tickets to Ko Lanta a couple of days in advance. We got them from a fairly reputable looking shop near the pier for about $12 each. There were a few different ferry providers available, but the prices all looked pretty similar so we just chose one at random. We did notice though that many of the early morning ferries were much more expensive than those leaving at or after 11:30 am.
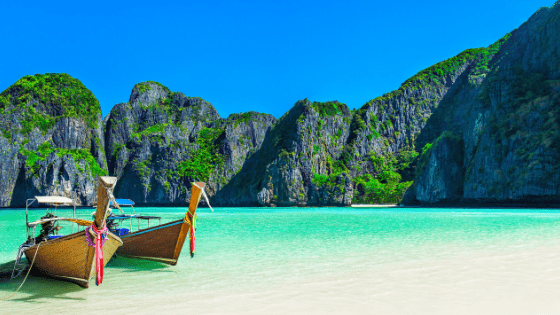
Getting around Phi Phi Don is very straight forward because you have two options: your feet or a longtail boat. There are no roads or cars on Phi Phi Don, so it is very easy to walk around. If your hotel/hostel is a quick walk from the pier, then you’re all set! However, some places are more remote and require that you take a longtail boat to get there. Our hotel offered a longtail boat transfer at certain times during the day for $5 per person per trip. However, if we wanted to go back to our hotel outside of these set times we had to hire a private longtail boat for $25-$50 per trip (the price jumps up at night). On our second night, we had to hire a private boat, and luckily we found a few people going in a similar direction who helped split up the cost.
By now you might be wondering what a longtail boat is. Well, it’s basically a long wooden boat that has four or five rows of wooden benches (usually fitting up to 20 people or so) covered by a tarp-like canopy. The boat is driven by someone who stands on the back and guides a propeller off the back of the boat (the propeller is driven by a large motor with a long shaft).

A Few Longtail Boats on Phi Phi Don
You may be wondering about Phi Phi Leh at this point, and I will start by telling you that this is one of the coolest and most beautiful places I have ever been to. However, this island is not inhabited by people so you will have to get tickets for a day cruise to visit this island. I will tell you more about our experience with Phi Phi Leh later in my second article, but for now, I’ll move on to Ko Lanta.
Ko Lanta
The island of Ko Lanta is much bigger than the Phi Phi islands, and it is a short two-hour ferry ride south from Phi Phi Don. This island is known for being a more laid-back island with a relaxing vibe, so we spent a lot of time at our resort and on Long Beach. We got to our resort via a taxi (which was actually a small pickup truck with a couple of covered benches in the bed) for $3 per person, and we actually bought our tickets on the ferry ride.
We didn’t leave our resort in Ko Lanta, but if you want to explore the island more than we did they did have many places with scooters for rent, or you could get a taxi. We really like Ko Lanta, and it allowed us a couple of days to relax near the end of our trip. The next stop on our trip was our last “island” destination: Railay Beach.
Railay
As I mentioned before, Railay is not actually an island but instead a peninsula, and you cannot get there by land. We took a van from Ko Lanta to Ao Nam Mao (the van had to park on a ferry for a short time to get off the island) and the trip took three or four hours. From Ao Nam Mao we got on a longtail boat which took us to the East side of Railay Beach. This trip set us back about $18 each, but we utilized the most convenient option (our hotel set this up) so you could probably find a cheaper way to do this.
Railay not only has some incredible beaches and resorts, but it is also a pretty popular rock-climbing destination. Similar to Ko Phi Phi, there are no cars in Railay but everything is walkable, including the three main beaches: Railay East, Railay West, and Phra Nang Beach. We actually spent most of our time on Phra Nang Beach, but we were able to get all around the peninsula by foot. There is also a short hike (some climbing is involved) up to a lookout point and lagoon. The lagoon was closed when we were there, but it was a fun hike none-the-less!
To get back to the mainland from Railay, you will have to take a longtail boat (of course) and leaving the peninsula is a little more unorganized than getting there. Instead of walking to a pier to look at a boat schedule and choose your departure time, you have to find a boat driver (it isn’t hard) and tell them you want to go to Ao Nang (if you are on the West side) or Ao Nam Mao (if you are on the East side). The driver will then be happy to take you and your group to the pier immediately for a flat fee (about $25-$30), but it is very common to tell them that you will wait until there are a total of about eight people on the boat. We did this on Railay West Beach, and we got to Ao Nang for $3 per person.
Ao Nang
When you get to Ao Nang, be prepared to jump ship, because that is literally what we had to do to get to shore. The boat driver took us close to shore and then fixed a ladder to the front of the boat and we plunged into waist-deep water, bags and all! We were traveling with large backpacks, and it wasn’t too difficult to keep our belongings dry, so instead of being an inconvenience, we thought this was hilarious.
We didn’t spend too much time in Ao Nang (just enough time for our shorts to get nearly dry), and we bought our bus tickets to the airport from a shop near the Ao Nang Traffic Police Box (on a street corner within view of the beach). The tickets were $5 each and soon we were on an hour-long bus ride to Krabi airport.
Wrapping It Up
Exploring the beautiful country of Thailand and learning along the way was an adventure in itself. Today I’ve focused on the logistics of our trip, and I’ve highlighted some destinations that you might consider for your trip. While I hope that this is helpful to you in deciding where you will go on your trip to Thailand, this is only half of the story! As I have eluded to before, there is so much to do in this country, and I will be writing an entire article about the places we stayed (including how we booked hotels) and the experiences we had. This article will be coming to you soon, so I hope you will stay tuned so you can get some ideas for some of the activities and excursions available to you once you arrive in Thailand. Until then, kob khun krup (thanks) for reading!
- Man’s Search For Meaning and Community
- The Best Way To Change A Habit – Rip The Bandaid Off
- I Need A Physical Challenge… So Let’s Go For A Run
- Positivity And Optimism Is Always The Answer
- Most Financial Advice Is Terrible and Here’s Why
